zondag 12 juni 2011
Mountain Tunnels - Part II
I started building the basic mountain structure by bunching up news print into various sized balls, held together with masking tape. I then started placing the crumpled paper balls over and beside the tunnel structure.


I started with the largest pieces first, and worked my way up with the smaller pieces. I crumpled paper into specific shapes in certain areas, and re-arranged the paper until my mountain was the basic shape I was looking for. Once everything was in place, I used long pieces of masking tape to hold the paper structure in place.


Using plaster cloth that I cut into 3 � 4 inch strips, I started to cover the crumpled paper, overlapping each strip by 1 � 2 inches. I started at the top, and worked my way down, ensuring there were no gaps and used my finger to smooth out any rough edges. I kept my tunnel portals in at this time so I could ensure the plaster cloth and portals fit together correctly. Once the first layer of plaster cloth was dry, I put on a second layer to make a sturdy, hard shell.


While the large mountain was drying, I built a second small mountain at the opposite end of my layout. I used the same method as before, arranging crumpled paper to get the desired shape, then covered it with plaster. I also added a rock casting that I previously made using a Woodland Scenics rubber mold and plaster of peris. I held the rock casting in place temporarily with tooth-picks until I was ready to use the plaster cloth.


Once the plaster cloth was dry, I used a soupy mixture of plaster of paris to cover the entire mountain structure to give it its final shape. Now I must admit, using plaster of any type is probably my least favorite thing to do. Plaster of paris is difficult to use as it sets extremely quickly, so there is only a small window to work with it, and you must use small batches at a time. I would have loved to use sculptamold, but the one hobby store in Lethbridge that sells it is closed for a month as they relocate.


I attempted to carve rock faces out of the set plaster, and found this to be very difficult, and not the right affect I was looking for. The carving worked in some areas, but not all as the plaster was either too soft or too hard, and just chipped away from the plaster cloth. In the problem areas, I used shallow molds that I made out of aluminum foil. This was also problematic as they need to be placed on the mountain at just the right time, or else they would crack and crumble, or just ooze out of the bottom of the mold.


Read More..


While the large mountain was drying, I built a second small mountain at the opposite end of my layout. I used the same method as before, arranging crumpled paper to get the desired shape, then covered it with plaster. I also added a rock casting that I previously made using a Woodland Scenics rubber mold and plaster of peris. I held the rock casting in place temporarily with tooth-picks until I was ready to use the plaster cloth.


woensdag 25 mei 2011
Mountain Tunnels - Part I
Before I could start the tunnel structure, which would be the base for the future mountain, I had to finish the track. First was paint. I experimented for a few days to find a method that covered quickly, and looked effective. Since my layout is right beside my furnace and hot water tank, and there is no ventilation, spray paint and enamels were out of the question. That left me with hand brushing with water-based acrylics.

To paint the track, I used Burnt Umber acrylic, mixed with a bit of grey and thinned it with 25% water and 25% isopropyl alcohol (70%). This mixture covered well, and dried quite uniformly on the ties and in the webs of the rails. I had to use extreme caution when painting the turnouts, making sure I moved them frequently while the paint dried so they didn�t get stuck in place. Once the paint was dry, I cleaned any paint off the top of the rails using a fine grit sanding block.


With the track painted, the last thing I needed to do was ballast the track. Unlike painting the track, I only ballasted the track that would be in the tunnels. This would allow me to finish the rest of the scenery on the layout and avoid having to work around the ballasted track.


I used a method that I found to be most popular in my online research. This method is to lay your ballast on the track and shoulders, then use a brush to level it between the ties and make it uniform. Then, using alcohol and an eye-dropper, gently wet the ballast. This reduces the water tension when adding the glue, and allows the glue to wick better through the ballast. Once the alcohol soaks in, apply a liberal amount of white glue, thinned 50% with water, and let this soak in as well. Be careful not to add too much glue at once, or your ballast with start to flow away. Once the glue completely dries, about 24 hours later, the ballast will be hard as concrete!

One thing I learned from this first ballast attempt is to not use too much ballast. You can always add more, but using too much makes things messy, and it�s almost impossible to brush all of the granules off of the tops of the ties. Model Railroader Magazine has a really good article in their February 2011 magazine about ballasting track. They explain a 2-part application process of ballasting, where you first apply glue, then ballast, then re-apply ballast and glue again. This method looks really nice in the end. I just might try this when I complete the rest of my track.

With the track and tunnel portals complete, I can finally start building the large mountain which the 2 tunnels will run through. Before I can build the mountain, I need to build each tunnel structure, which the mountain scenery will sit on. Each tunnel, which will include the supports, the walls, and a common ceiling, and will act as the base for the mountain.
The first task is accessing de-railed trains inside the mountain. The double wide tunnel is wide and short enough that I can access the inside of the tunnel from either side. The smaller, single tunnel which goes under the double tunnel, is the opposite situation. To solve this, I cut an opening in the benchwork right beside the track. This will allow me at least some room to retrieve a train if it becomes stuck in this tunnel.

Tunnels are dark, so to keep things as dark as possible, everything inside the portals was painted black, with no exceptions. Since there were sections of the tunnel that didn�t have a complete wall, it was important that everything was blacked out, so nothing could be seen inside the tunnels. I used cheap black acrylic paint from the dollar store, which worked great for this purpose.


I then used Styrofoam to start building the walls. I used a combination of white glue and toothpicks to hold the foam together and keep it in place while the glue dried. Once dry, each wall section was painted black. I did visual checks on each end with the portals in place, to ensure that no wood or white Styrofoam was visible from any angle, and if there was, I quickly covered it with black paint.


Due to spacing limitations, I had to combine the small and large portal on the tunnel entrances on the right hand side of the mountain, as seen below. I cut off 1 inch at the left base of the large portal, and glued it to the top of the right side of the small portal. This now allows both portals to exist where they were both intended to be.


Any gaps were filled in with carefully cut pieces of foam, and upon my final inspection, there was not even a sliver of light visible inside the tunnels. Now I have a solid tunnel structure which my mountain can be built on top of, without any possibility of affecting the tunnels themselves.

Read More..

To paint the track, I used Burnt Umber acrylic, mixed with a bit of grey and thinned it with 25% water and 25% isopropyl alcohol (70%). This mixture covered well, and dried quite uniformly on the ties and in the webs of the rails. I had to use extreme caution when painting the turnouts, making sure I moved them frequently while the paint dried so they didn�t get stuck in place. Once the paint was dry, I cleaned any paint off the top of the rails using a fine grit sanding block.


I used Woodland Scenics Medium Buff ballast. This, like most everything else, was my first time ballasting track, so doing it in the tunnel sections, where it would be a lot less noticeable, was a perfact place to start.

I used a method that I found to be most popular in my online research. This method is to lay your ballast on the track and shoulders, then use a brush to level it between the ties and make it uniform. Then, using alcohol and an eye-dropper, gently wet the ballast. This reduces the water tension when adding the glue, and allows the glue to wick better through the ballast. Once the alcohol soaks in, apply a liberal amount of white glue, thinned 50% with water, and let this soak in as well. Be careful not to add too much glue at once, or your ballast with start to flow away. Once the glue completely dries, about 24 hours later, the ballast will be hard as concrete!

One thing I learned from this first ballast attempt is to not use too much ballast. You can always add more, but using too much makes things messy, and it�s almost impossible to brush all of the granules off of the tops of the ties. Model Railroader Magazine has a really good article in their February 2011 magazine about ballasting track. They explain a 2-part application process of ballasting, where you first apply glue, then ballast, then re-apply ballast and glue again. This method looks really nice in the end. I just might try this when I complete the rest of my track.

With the track and tunnel portals complete, I can finally start building the large mountain which the 2 tunnels will run through. Before I can build the mountain, I need to build each tunnel structure, which the mountain scenery will sit on. Each tunnel, which will include the supports, the walls, and a common ceiling, and will act as the base for the mountain.
The first task is accessing de-railed trains inside the mountain. The double wide tunnel is wide and short enough that I can access the inside of the tunnel from either side. The smaller, single tunnel which goes under the double tunnel, is the opposite situation. To solve this, I cut an opening in the benchwork right beside the track. This will allow me at least some room to retrieve a train if it becomes stuck in this tunnel.

Tunnels are dark, so to keep things as dark as possible, everything inside the portals was painted black, with no exceptions. Since there were sections of the tunnel that didn�t have a complete wall, it was important that everything was blacked out, so nothing could be seen inside the tunnels. I used cheap black acrylic paint from the dollar store, which worked great for this purpose.


The entrance to each portal is the most visible, so it was important that there were complete side walls on both sides of each portal, extending far enough into the tunnel so you could not see that it ended. As seen in the top portal, right side of the mountain, I used 1/16� wood craft board as a divider from the lower tunnel portal. This was to prevent light from either of the portal entrances, showing through to either the top or lower tunnels. I had to use the thin 1/16� wood craft board as the foam I had was too thick to use without interfering with the lower tunnel.


Once I ensured the tunnel portals fit correctly, and were temporarily in place, I did a final visual inspection to make sure everything was pitch black inside. I then used a large template to cut a solid one-piece foam roof for the entire tunnel structure. I attached foam supports on the back-board, secured with screws and glue, to support the back and left edge of the roof. I painted the roof and foam supports black, and glued it into place.


maandag 23 mei 2011
Tunnel Portals from Scratch
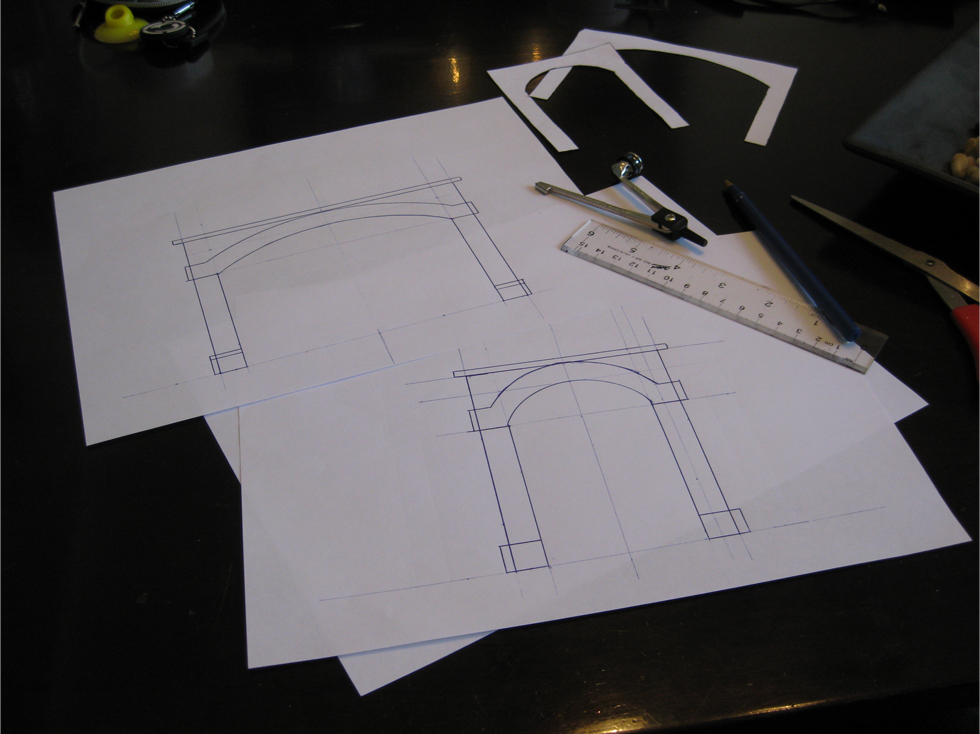
To be a bit thriftier, I decided to build my own tunnel portals of the 2 mountain tunnels. I built them out of styrene plastic and to my own custom size and specification so they fit my track and tunnels perfectly. I started out by measuring the sizes that they needed to be, then made a scale drawing on paper to show how I wanted them to look. I then traced templates which I transferred to foam board, and cut mock-ups of each tunnel portal. I used these foam mock-ups to ensure each portal fit the track correctly.


Once I verified how the portals looked with the foam mock-ups, I used the same traced templates to cut the main portal shape out of styrene. To give the portals their 3-D shape, I used a scrap piece of square wood doweling to ensure each side was glued at a perfect angle.


Read More..


I then used a thicker piece of styrene for the top of each portal, which each had a slight overhang. You can notice one of the large portals is flush on its right hand side. This is because it will but directly up to the backdrop.


I then added the final details, which included an extending arch over the portal entrance, which wrapped around the portal itself. Wide footings were added to the base of each portal, and a curved inner arch for the roof was also put in. The last thing will be to paint them, however I�m not sure what colour they will be until I get further into my scenery.


donderdag 28 april 2011
Trackside Signals
My trackside signals are finally complete! When I purchased the little trackside signal face plates and matching LED lights off eBay for about $8.00 last year, I thought I was being really thrifty, which I was, however I then realized that I was now faced with the responsibility of having to make the light standards to hold these signals. Wiring was not an issue as I had incorporated these into my main wiring system, but I now had to find a way to make them look at least somewhat realistic on my layout.

As I mentioned before, the signals themselves were purchased off eBay for about $8.00. This included 10 black signal face plates which held 3 LED lights each, 30 LED lights (red, green, and yellow), and 30 matching resistors. Once the LED lights were glued into the face plates, I used telephone wire, which I soldered to the contact points on the LEDs. Telephone wire worked great as not only because it�s cheap and inexpensive, but the 4 wires are red, yellow, green, and black, which matched perfectly with the LED colours!


For paint, I used steel coloured enamel for all of the metal parts, such as the ladder and mast. I used a flat grey to simulate concrete on the base. The signal units themselves were painted flat black on all sides. Once the paint dried, I drilled holes through my benchwork, allowing the wires to run through to the underside, where I connected them to the rest of the wiring. I used temporary screws to hold them in place until I start my scenery.

The end result looked pretty good, considering I have never scratch built anything with styrene before. The cost was a lot less as well. Signals can run anywhere from $25 right up to $50 or $60 or higher for really nice ones. I spent in total about $30 for all 5 of mine. I know they aren�t exactly prototypical, but compared to some that I�ve seen in stores, I�m pretty satisfied with how they turned out.

For a diagram of how I wired my signals, click HERE, or visit my Wiring Diagrams page for other examples.
Read More..


To build the light standards, I went to my local hobby shop and visited the Evergreen Models styrene plastic display. Evergreen makes bulk styrene strips in almost every shape and size imaginable, which is great for these types of projects. I used 7/16� tubing for the mast, which is a little larger than most prototypical-sized masts, but this is the smallest size that would allow me to run the 8 wires through for the dual signals. I then cut notches in the tops of each mast to allow the signals to fit into them.


I then used slightly larger tubing that allowed the 3/16� tubing to fit snugly inside for the base support, as well as around the base of each signal to act as a support. The mast and support where then glued to a 1/16� base. I glued small rectangular pieces of thin styrene on the sides of each signal. This created a smooth transition from the signal to the mast. A second, smaller piece of styrene was then glued to that, simulating a maintenance door. I use poly-filler to fill in any gaps, and to smooth out any really rough edges.


The maintenance ladders were all hand made using .04" styrene strips. I carefully cut every rung to the exact size I needed, then carefully glued them to one of the side supports. I did this on a flat surface to ensure the rungs were all aligned with the support and were all level and square. Once dry, I glued on the other support. Once dry, I glued them directly to the signal units.


zondag 3 april 2011
One Year Mark
Just over a year later, my benchwork, track, electronics, and control system are finally complete! This weekend I made the last adjustments to my track-work, soldering a few more connections and leveling out a few last problem areas on the track. Both my Backmann EMD GP30 and my Kato SD-40 engines run perfectly on the layout and all aspects of the control panel and electronics, including the dual-cab wiring, work perfectly.


I also added a handle to the winch that raises and lowers the control panel, so I no longer have to use a screwdriver as a lever. I also came up with a latching system that will lock the control panel into place when it is in its raised position. This prevents all of the weight being on the winch cable, and also makes the control panel more rigid when in use.

To do this, I used two double ended bolts that I attached to the underside of my benchwork. I then drilled two holes through the control panel base so the protruding bolt end could pass through the control panel base when it was raised up against the benchwork. I then used butterfly bolts to support the control panel on these bolts. To make locking as easy as possible, I cut slots in the holes that I drilled, allowing the butterfly bolts to pass through the control panel base. This prevents the butterfly nuts from having to be completely undone. Once the butterfly bolt passes through the control panel base, it is turned 90 degrees, allowing the entire control panel to rest on the bolts (as seen above). Metal braces were added to prevent the bolts from damaging the hardboard.
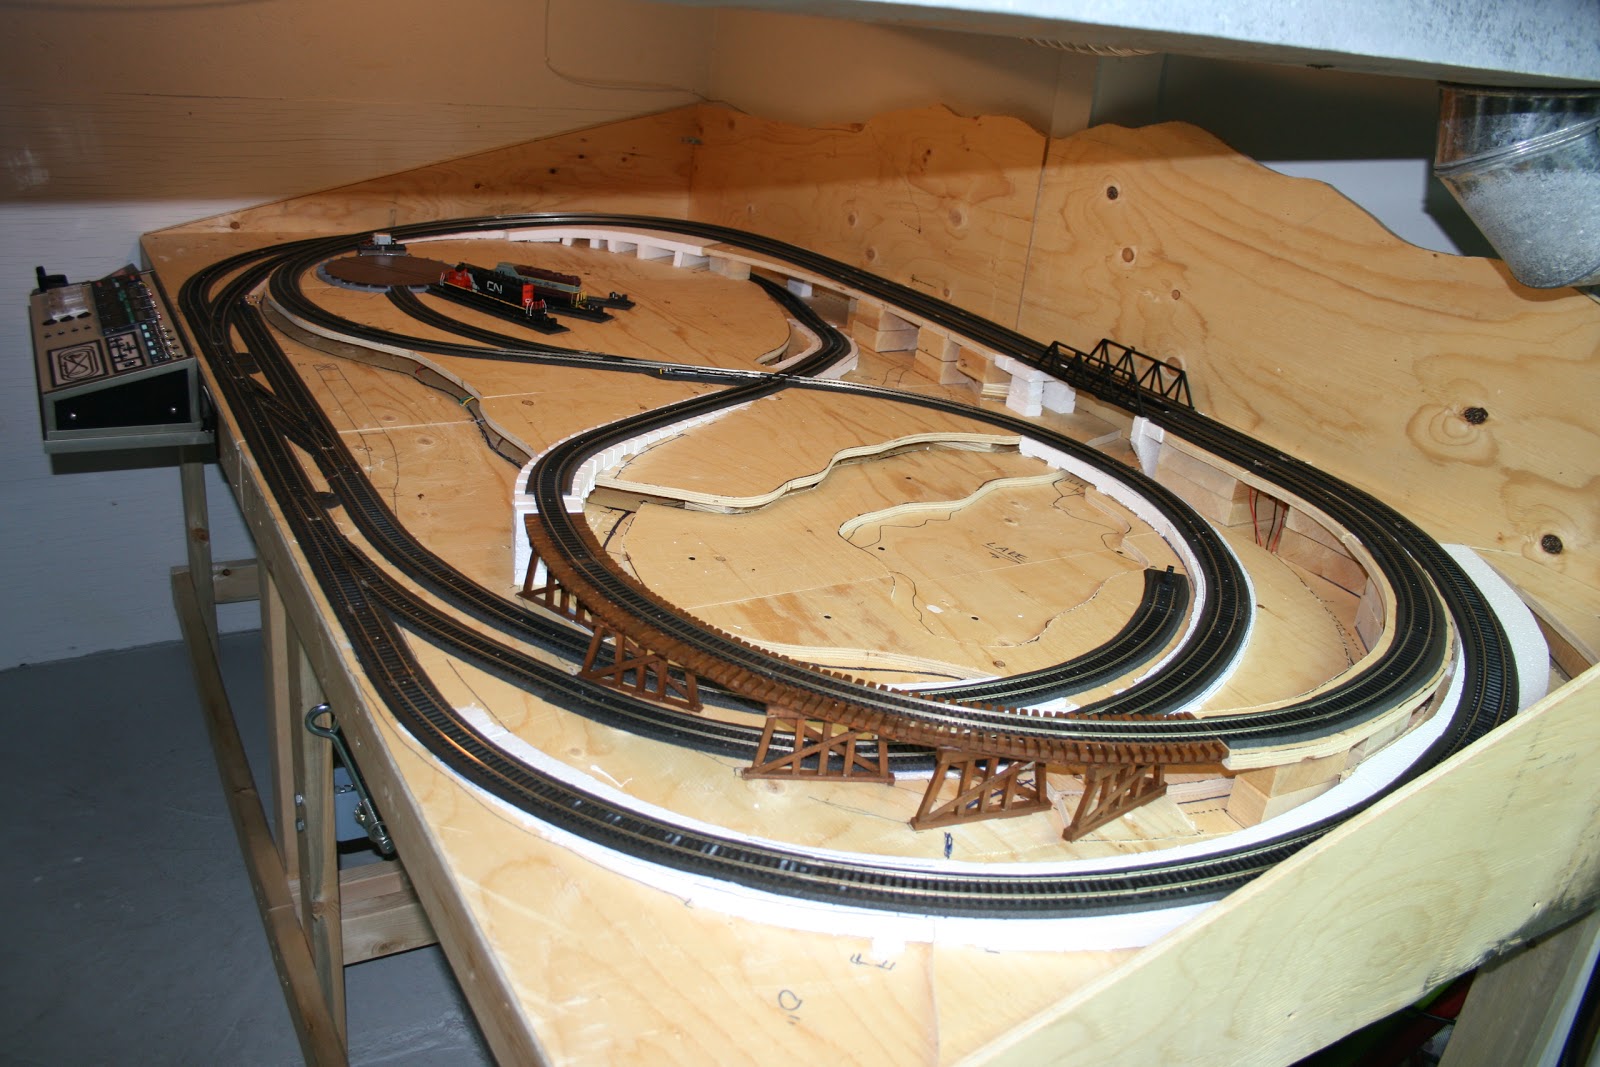
I have now stated to plan the landscaping for me layout, which will be my project for the next couple months at least.
Abonneren op:
Posts (Atom)

